TradeAdapt
HEIKIN TRACKER
- Multi-Timeframe Signal Detection
- Visual Market Structure
- Professional Order Management System
- Automated Stop & Target Management
- Hotkey Control System
TRACKER: SIGNAL
Heikin Tracker: Signal combines multi-timeframe analysis with hands-on trade management in a single interface. It identifies structural shifts in the market and gives you the tools to act on them – all from your chart.
The Complete Trading Tool
This isn’t just an indicator – it’s a trading workspace. Signal detection, visual structure, position tracking, order management, and execution controls all live in one place. See the setup, take the trade, manage the position.
Signal Detection
Multi-Timeframe Analysis
The system monitors multiple timeframes simultaneously, looking for alignment. When structure shifts across timeframes, that’s your signal. The visual feedback is immediate – you see structure changes as they happen.
Adaptive Bars or Heikin Ashi
Choose your foundation: AdaptBars for dynamic volatility-adjusted structure, or Heikin Ashi for smoothed price action. Both modes provide the same signal detection logic, just with different underlying price representations.
Paint Bar Visualization
Bars color based on structural position:
- Green: Bullish structure
- Red: Bearish structure
- Yellow: Neutral or transitional
The coloring changes in real-time as structure evolves, giving you instant visual feedback on market state.
Visual Structure Lines
RTX Levels (Reversal Transition eXecution)
Dynamic support and resistance zones calculated from multi-timeframe structure. These levels adapt as market conditions change, showing you where structure is likely to hold or break.
Target Levels
Projected price objectives based on structural momentum. When structure aligns strongly, target levels indicate where the move might extend to. Useful for profit-taking decisions.
Display Modes
Choose how levels appear on your chart:
- Buy/Sell Lines: Separate levels for both directions
- Mids Only: Calculated midpoints between buy and sell levels
- Combo: Dynamically shows buy or sell levels based on price position
Visual System Progression
Watch how the system builds from basic levels to a complete multi-timeframe trading setup with position management.
Step 1: Basic TX Levels
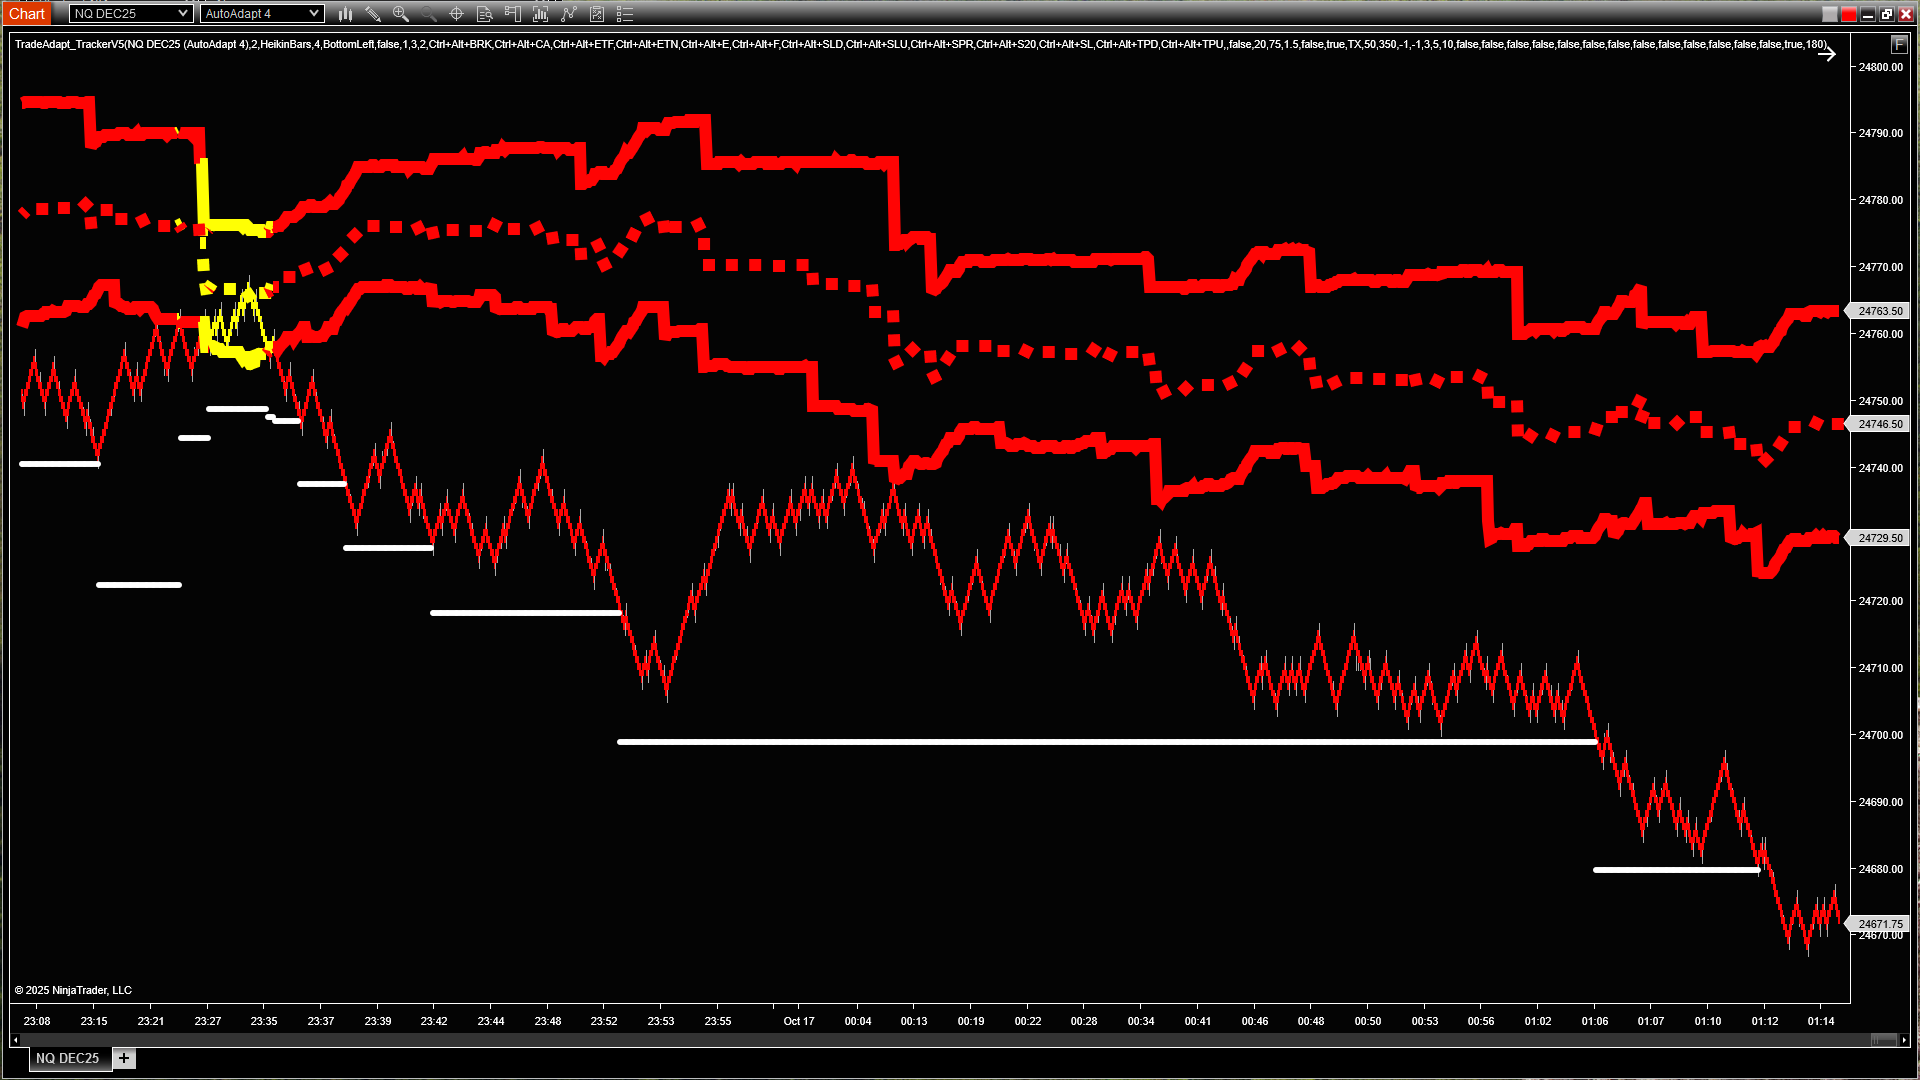
BuyTX (green), SellTX (red), Mid (blue), and Target lines (white). Yellow bars indicate caution/transition zones. (click to enlarge)
The foundation: TX levels from 6 longer-term timeframes and 4 AdaptBar timeframes (10 total). Buy and Sell levels provide directional zones, Mid shows the calculated midpoint, and white Target lines project potential moves.
Step 2: Mid-Only Display Mode
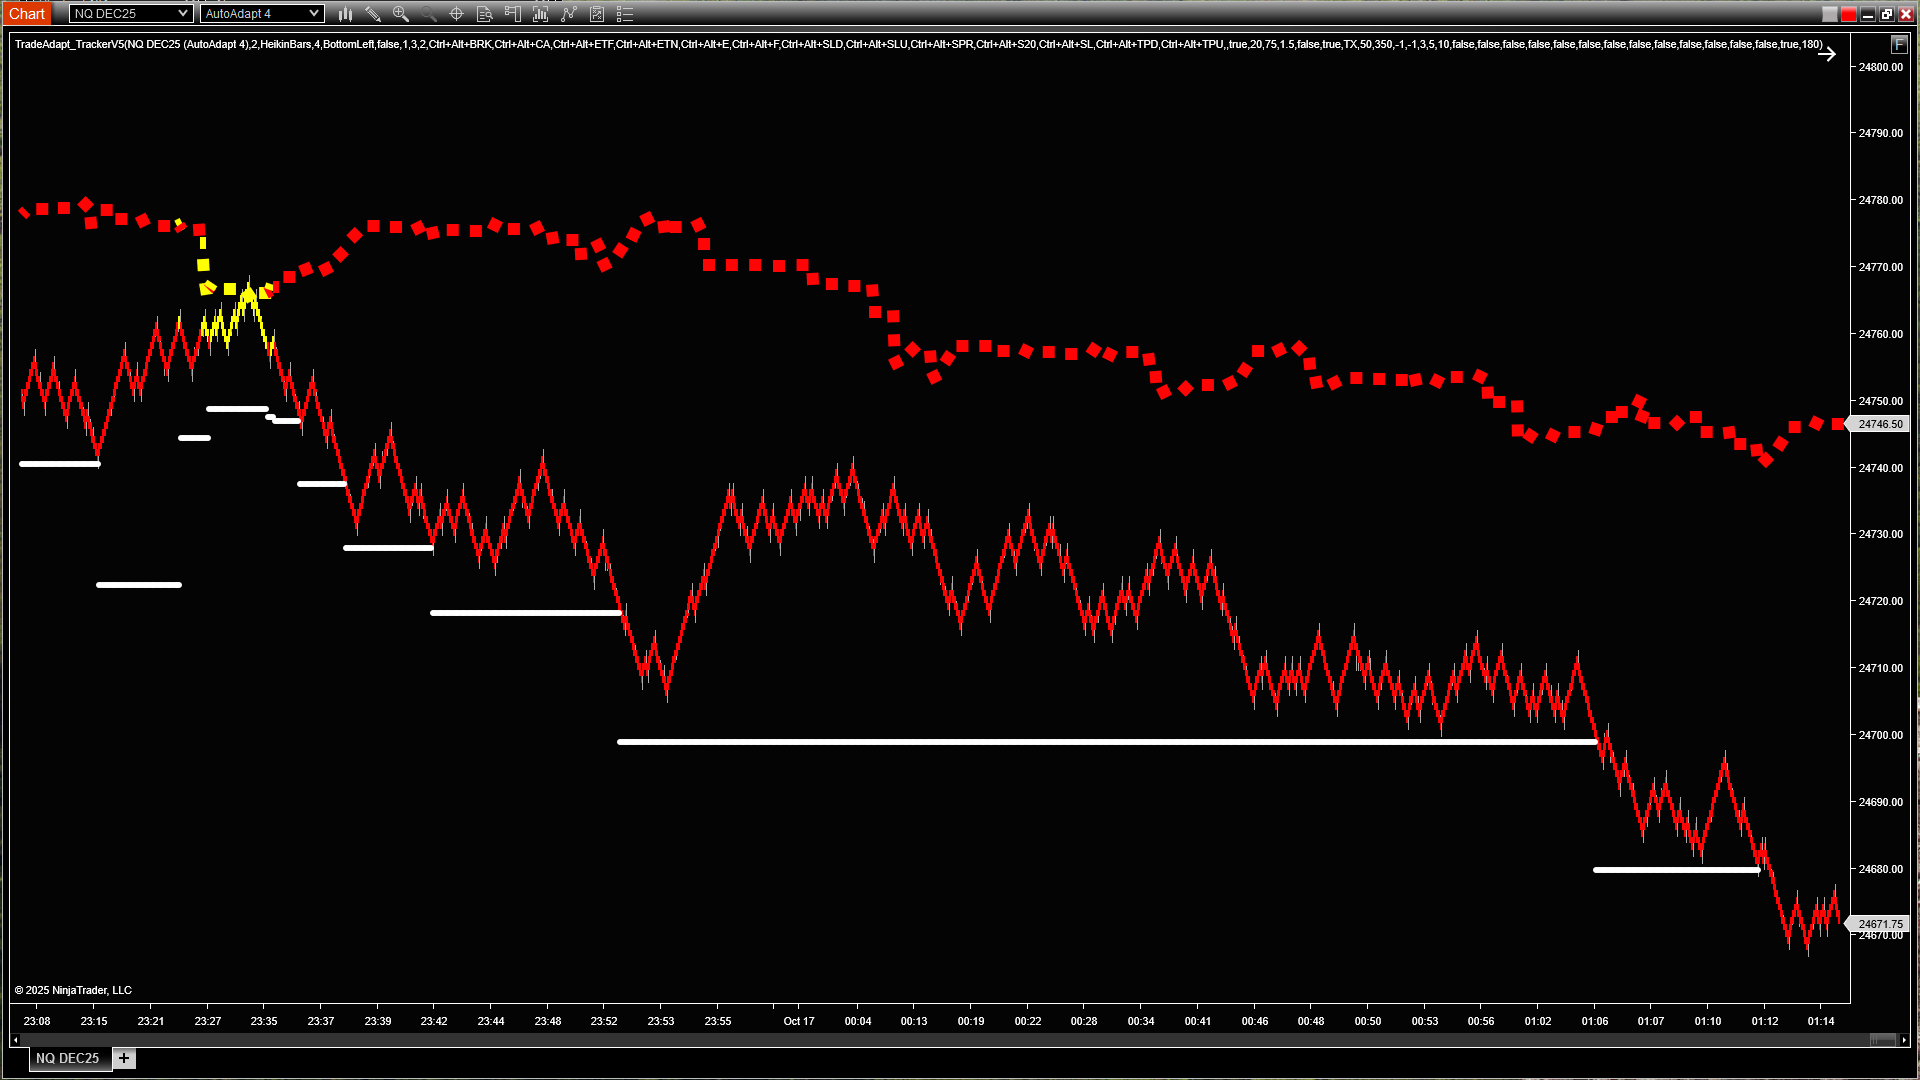
Simplified view showing only MidTX line and target levels for cleaner chart display (click to enlarge)
For traders who prefer less visual clutter, Mid-Only mode displays just the calculated midpoint between buy/sell levels and the target projections. Same structural information, cleaner presentation.
Step 3: Combo Mode with MultiAdapt
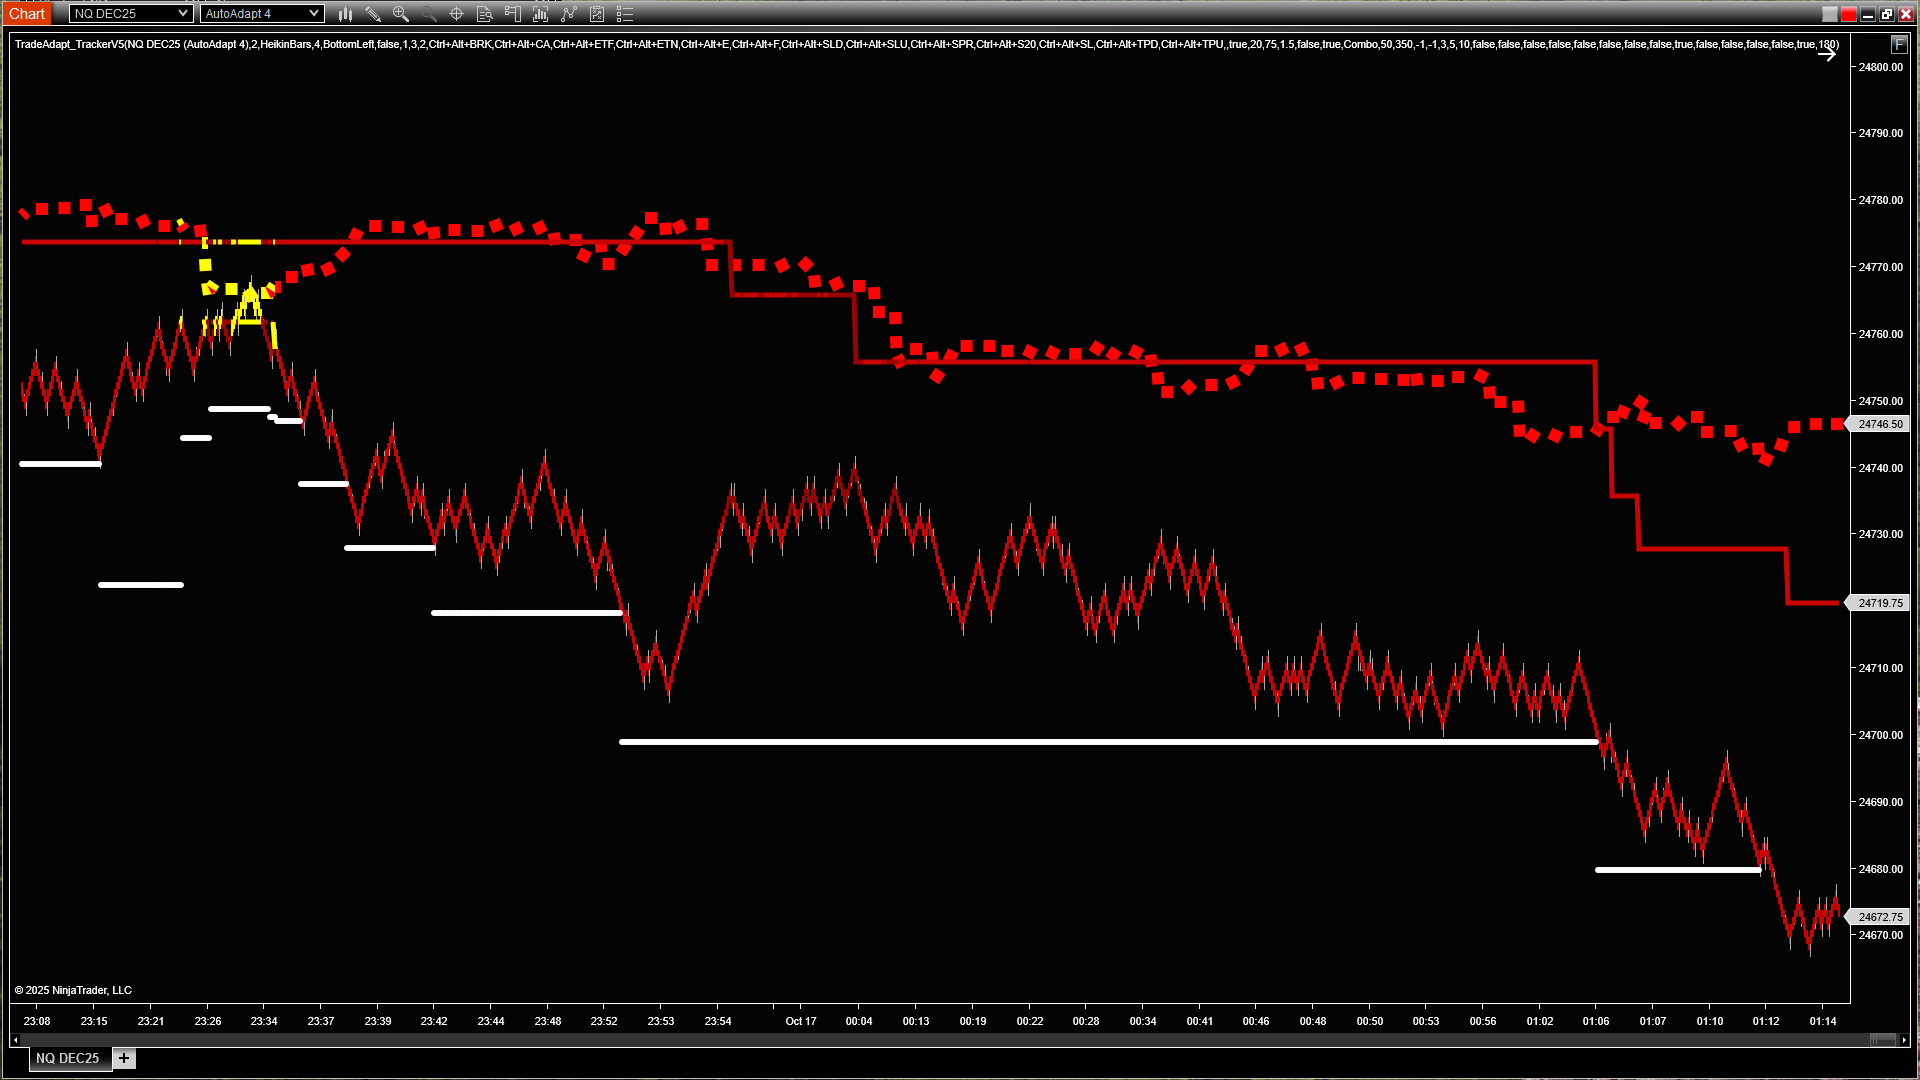
Combo mode dynamically shows MidTX, targets, plus MultiAdapt Pro line for multi-system confirmation (click to enlarge)
Combo mode intelligently displays the relevant directional level based on price position. Here we’ve added a MultiAdapt Pro line (reading external data) for additional timeframe confirmation.
Step 4: Complete Multi-Timeframe System
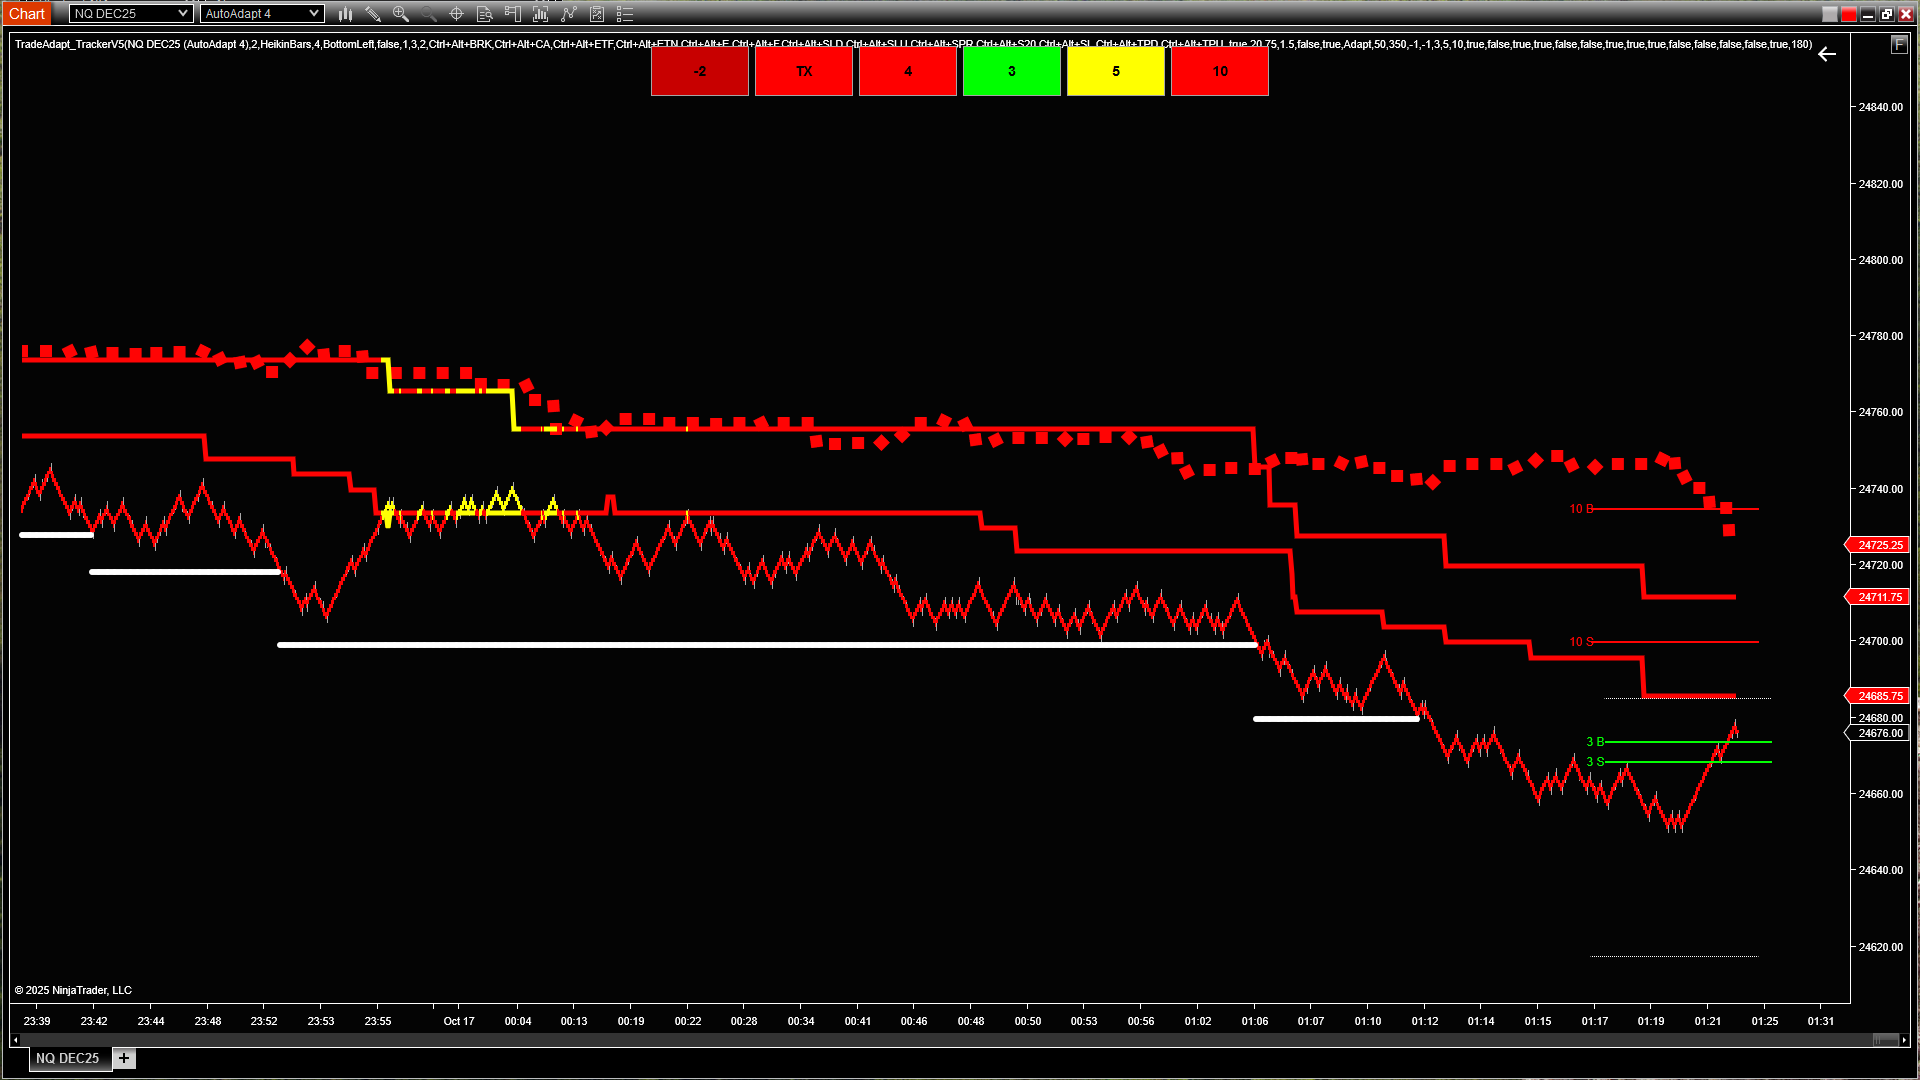
Full system: MultiAdapt PRO (4 buttons at top) + Tracker Signal (TX button). 26 timeframes on one chart. (click to enlarge)
The complete analytical framework: MultiAdapt PRO monitors 16 timeframes (4 systems × 4 timeframes each), Tracker TX adds 10 timeframes (6 longer-term + 4 AdaptBars). That’s 26 different timeframes consolidated into actionable signals on a single chart. The buttons at top show real-time status of each system. File reading enabled displays all system states simultaneously – easy to follow, easy to trade.
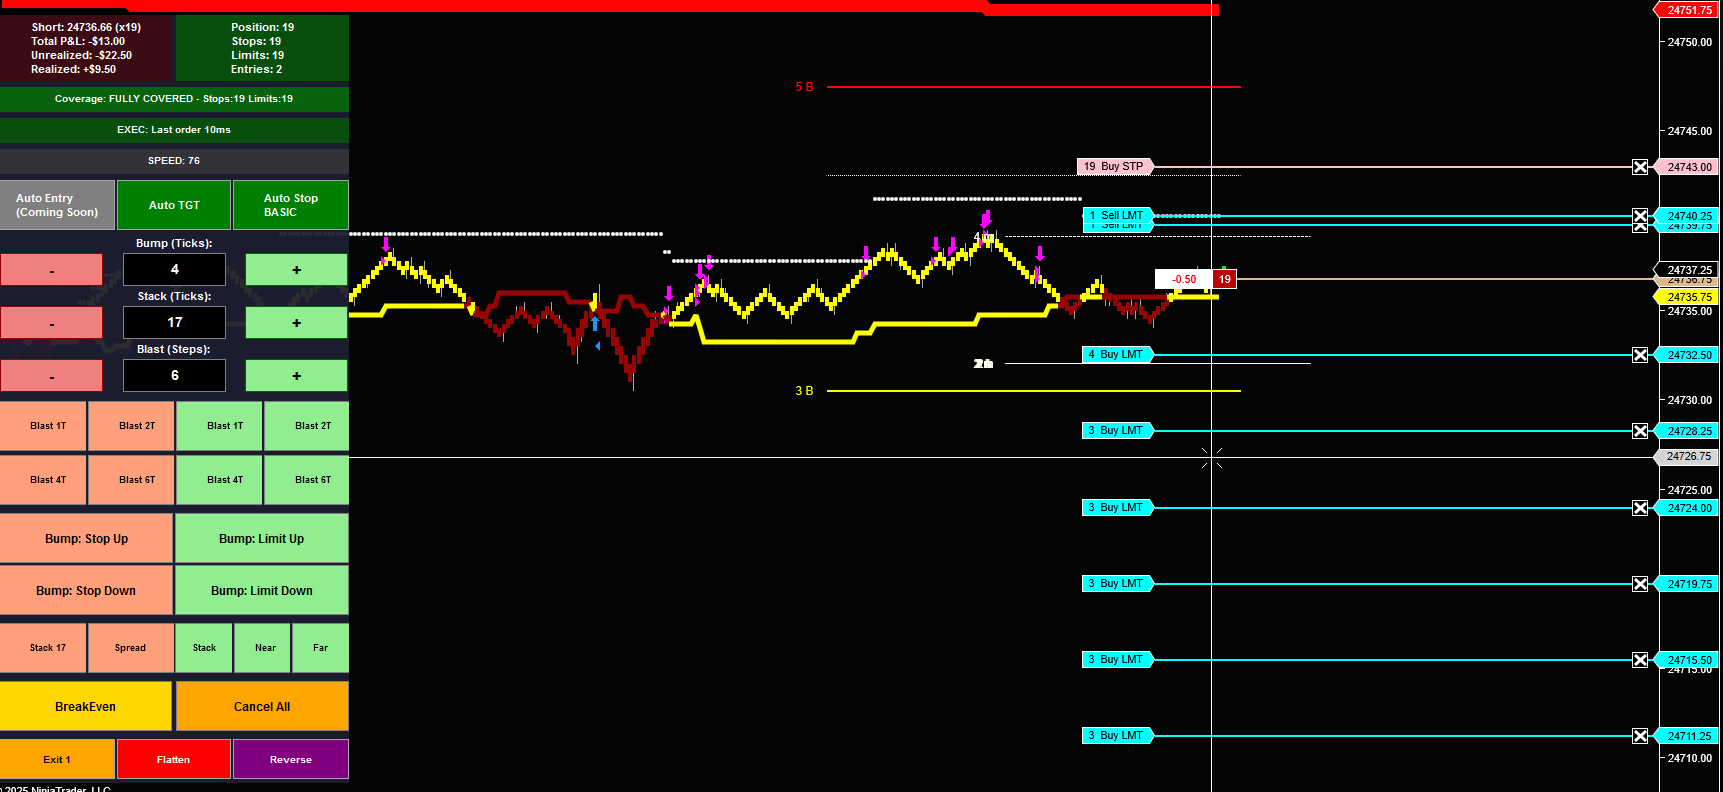
Step 5: Adding Order Management (OMS)
Complete system + OMS: Short position entered, Auto Stop and Auto TGT enabled and working (click to enlarge)
Now we add execution: the OMS widget (TrackerV5) shows an active short position with initial stop protection and target orders placed. Auto Stop and Auto TGT features are enabled – the system will manage risk automatically as targets fill. All 26 timeframes still visible, position management integrated directly on the chart.
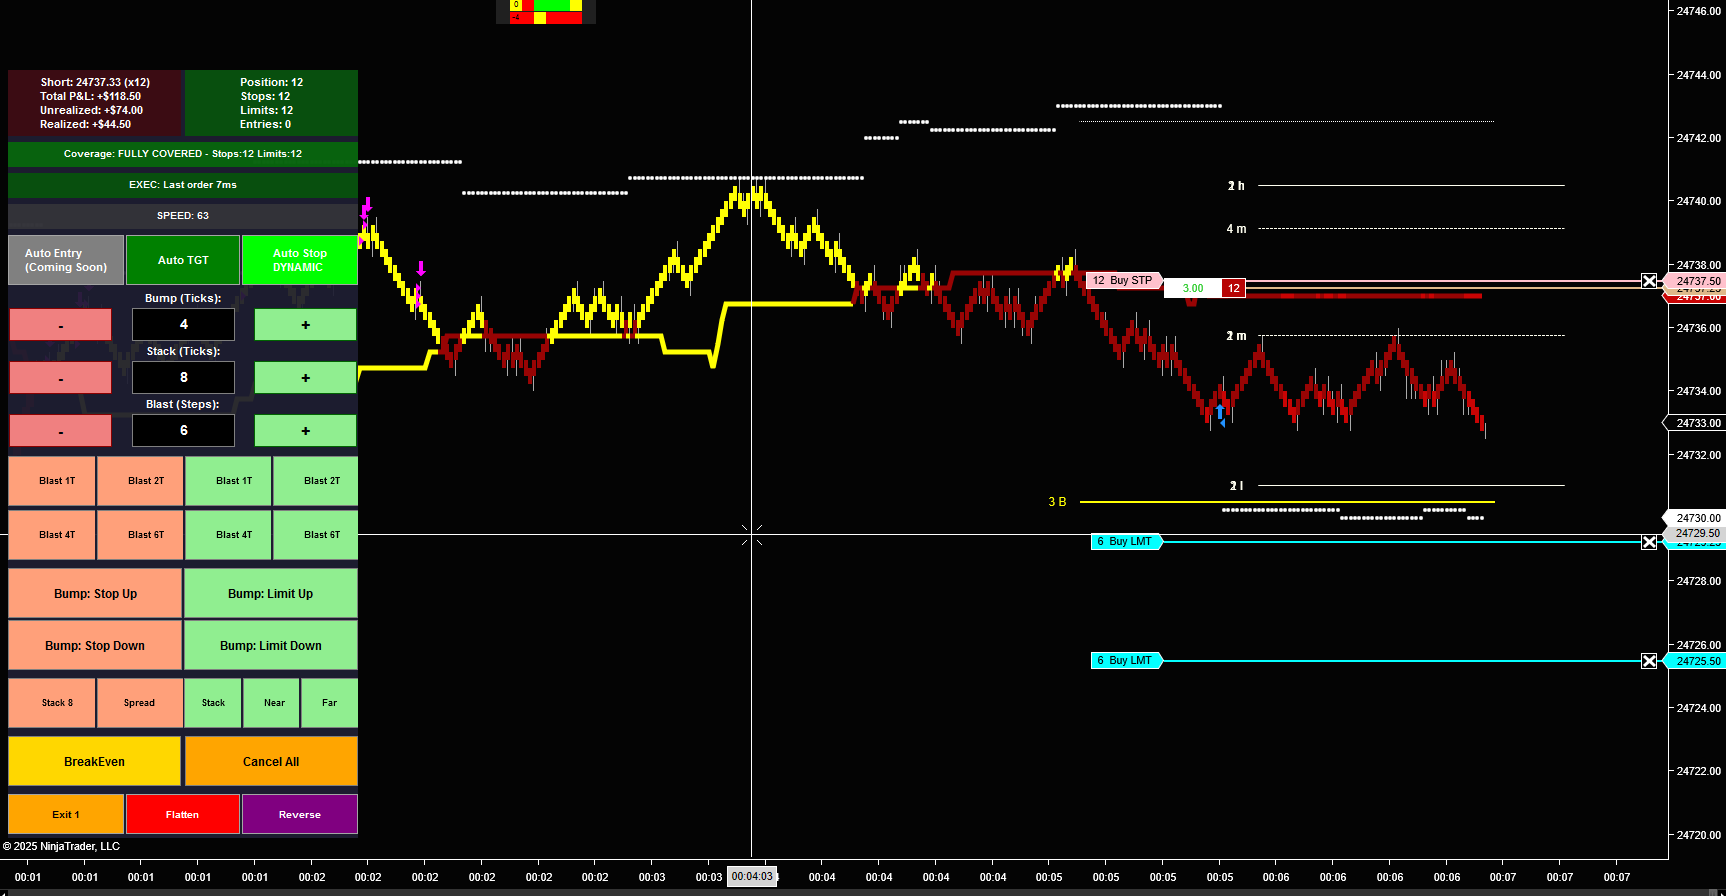
Step 6: First Targets Hit – BreakEven Protection
Automated risk management: Initial targets filled, stops automatically moved to breakeven – trade now risk-free (click to enlarge)
Professional trade management in action: As the first profit targets fill, the Auto Stop feature automatically moves the stop to breakeven (entry price). The trade can no longer lose money. This is how professionals protect capital – let the system handle the mechanics while you focus on market structure.
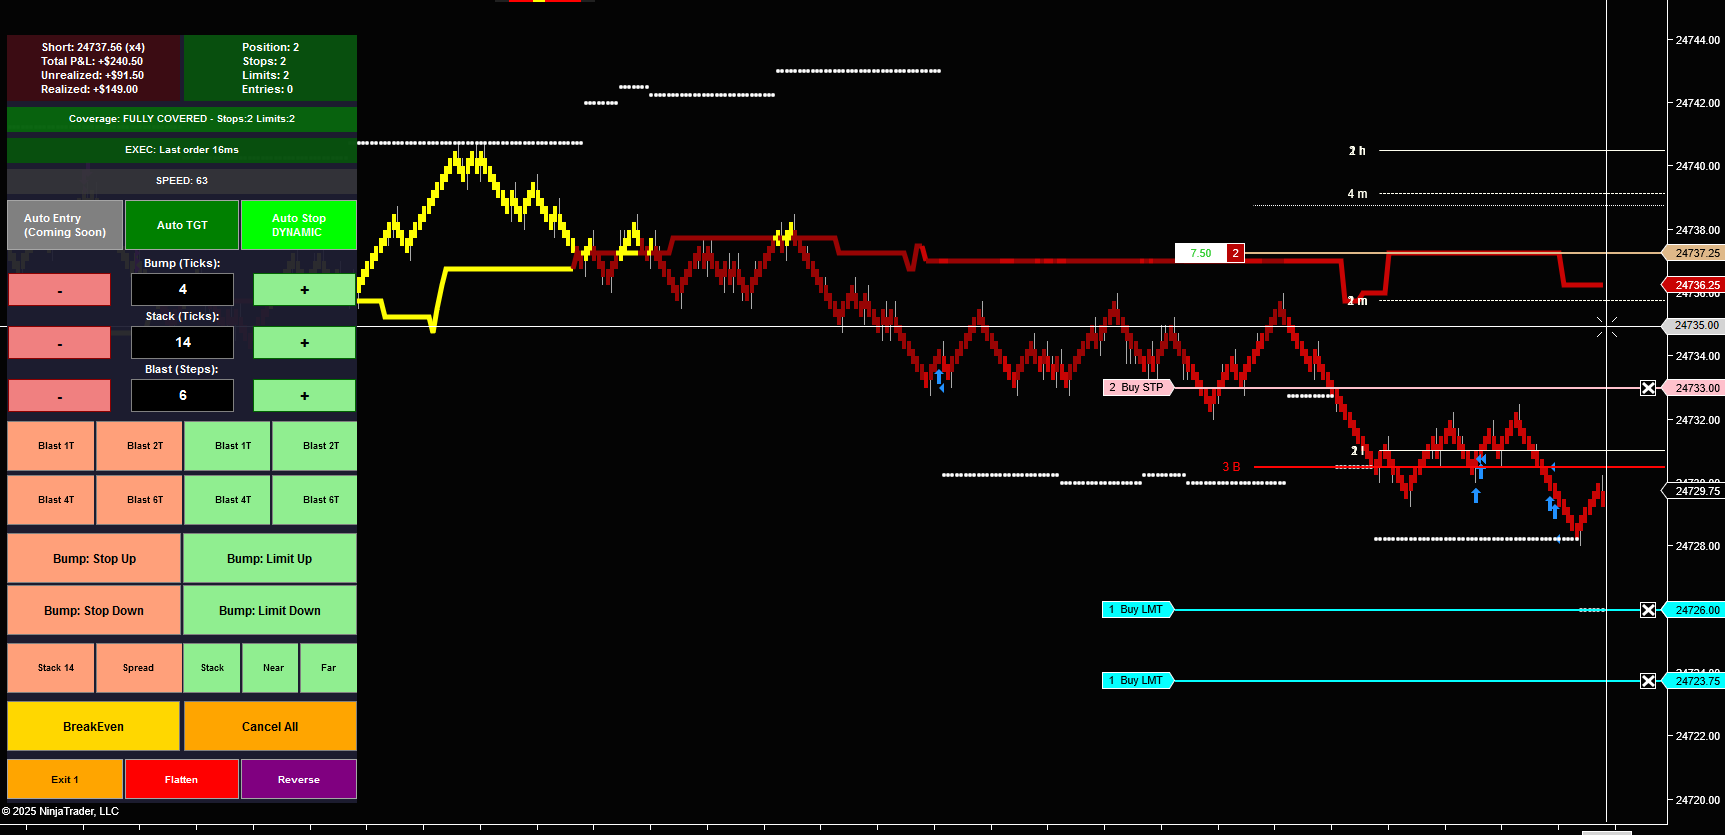
Step 7: Trailing Stops Lock In Profit
Advanced automation: More targets filled, stops trail down into profit territory, locking in gains (click to enlarge)
The final stage: Additional targets continue to fill, and the stop trails aggressively to protect accumulated profit. Position size scales down with each target hit. The trader set it up once at entry – Auto Stop and Auto TGT handled everything from there. This is the complete system: 26-timeframe analysis feeding into automated position management.
1. Signal Generation: 26 timeframes (MultiAdapt PRO + Tracker TX) identify high-probability setups
2. Entry Execution: OMS widget enters position with one click
3. Risk Management: Auto Stop moves to breakeven, then trails with targets
4. Profit Taking: Auto TGT scales out systematically
5. Final Protection: Remaining position held with tight trailing stop
All automated. All on one chart. This is professional-grade trading infrastructure.
MultiAdapt Integration
External Data Reading
Heikin Tracker can read data from MultiAdapt Pro indicator running on separate charts. This lets you combine multiple analysis systems – different timeframes, different instruments, different calculation methods – all feeding into one decision framework.
Confirmation Logic
When Heikin Tracker’s internal signal aligns with external data from MultiAdapt, you have multi-system confirmation. Use this for higher-confidence setups or to filter out weaker signals.
File-Based Communication
The systems communicate via file read/write – lightweight, reliable, and doesn’t impact chart performance. Set up once, works continuously.
Position Management Panel
Live Position Tracking
The on-chart panel shows your current position in real-time: direction (Long/Short/Flat), quantity, and average entry price. You know exactly where you stand at a glance.
Quick Action Buttons
One-click order placement directly from the chart:
- BUY/SELL: Enter positions at market
- Flatten: Close entire position instantly
- Reverse: Close and flip direction in one action
- Stop/Target Controls: Place and adjust protective orders
Order Quantity Management
Set your position size directly in the panel. Adjust on the fly without digging through menus. The system remembers your last setting for consistent sizing.
Hotkey System
Keyboard Control
Every panel function has a configurable hotkey. Trade without touching the mouse. Speed matters when structure is shifting.
Common Hotkey Setup Examples
- B: Buy Market
- S: Sell Market
- F: Flatten Position
- R: Reverse Position
- Q/W: Adjust Stop Levels
You define what works for your muscle memory and trading style.
Speed Display
The system includes a Speed Display that shows the current speed of the market. Compare this with the Execution Timeframe to ensure orders hit the market quickly. When market speed is too fast relative to execution timeframe, you’ll see this in the display – helping you avoid entries when order slippage risk is high. This is critical for maintaining consistent execution quality, especially in volatile conditions.
SuperDOM Output
Send Levels to DOM
Enable data output to send your structural levels to a SuperDOM column. This gives you level visualization directly in the order ladder, making it easier to place orders at structural prices.
Real-Time Sync
As levels update on your chart, they update in the DOM. File-based communication keeps everything synchronized with minimal performance impact.
Configuration Approach
Start Simple
Default settings work for most traders. Enable paint bars, position panel, and one set of target levels. Trade with that setup before adding complexity.
Layer Gradually
Once comfortable with basic operation:
- Add MultiAdapt data reading for multi-system confirmation
- Enable hotkeys for your most-used actions
- Experiment with different paint bar modes
- Adjust multiplier settings for timeframe separation
Customize Your Workspace
Position the control panel where it makes sense for your screen layout. Hide elements you don’t use. Set up hotkeys that match your muscle memory from other platforms.
What This Tool Is (and Isn’t)
It Is:
- A visual representation of market structure
- A position management interface
- An order execution tool with hotkey control
- A framework for combining multiple analysis systems
It Isn’t:
- A fully automated trading system
- A guaranteed profit generator
- A replacement for trading skill and judgment
- Magic – you still need to understand markets
TRACKER: EXECUTE (TrackerV5 OMS)
TrackerV5 is a professional-grade Order Management System (OMS) widget designed for active traders who need precise control over their positions. Built directly into NinjaTrader charts, it provides instant access to advanced order management tools without cluttering your trading interface.
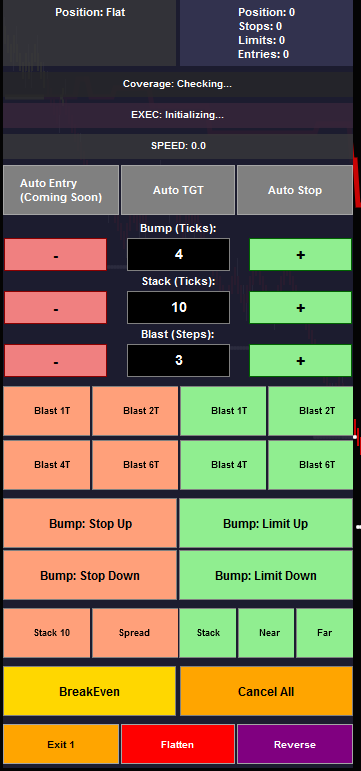
TrackerV5 OMS Widget showing all control sections (click to enlarge)
TrackerV5 in Action: Live Trade Example
Watch how TrackerV5 manages a real trade from entry to exit. This sequence demonstrates automated stop management, profit-taking, and position scaling in a live market environment.
Step 1: Initial Entry and Stop Placement
Trade initiated with position entry and initial stop loss placement (click to enlarge)
The trade begins with position entry and initial stop protection. Notice the widget shows active position size and stop orders working. The system is monitoring for the first profit target to be hit.
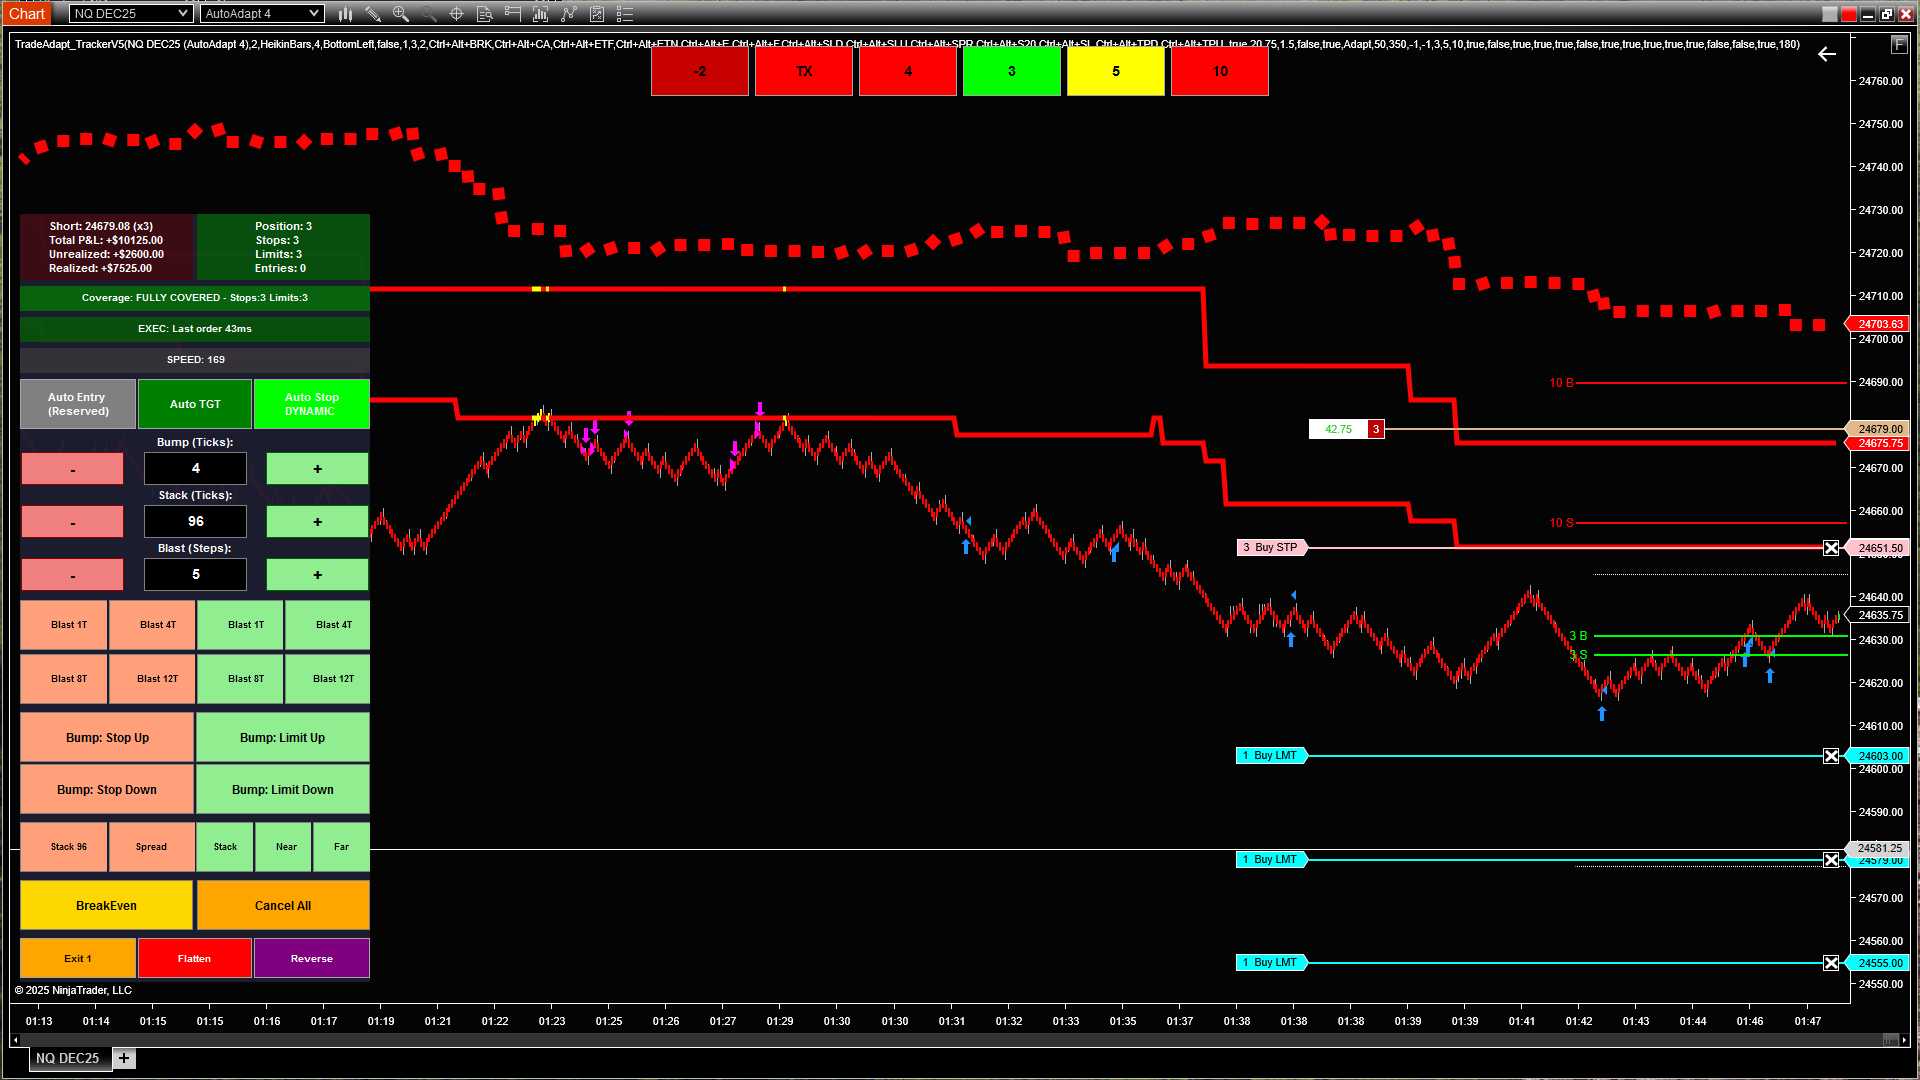
Step 2: First Target Hit – Automatic BreakEven
After initial target is hit, stops automatically move to breakeven – risk eliminated (click to enlarge)
Key Moment: Once the first profit target fills, TrackerV5’s Auto Stop feature automatically moves the stop to breakeven (entry price). The trade is now risk-free. This is professional-grade risk management executing without manual intervention.
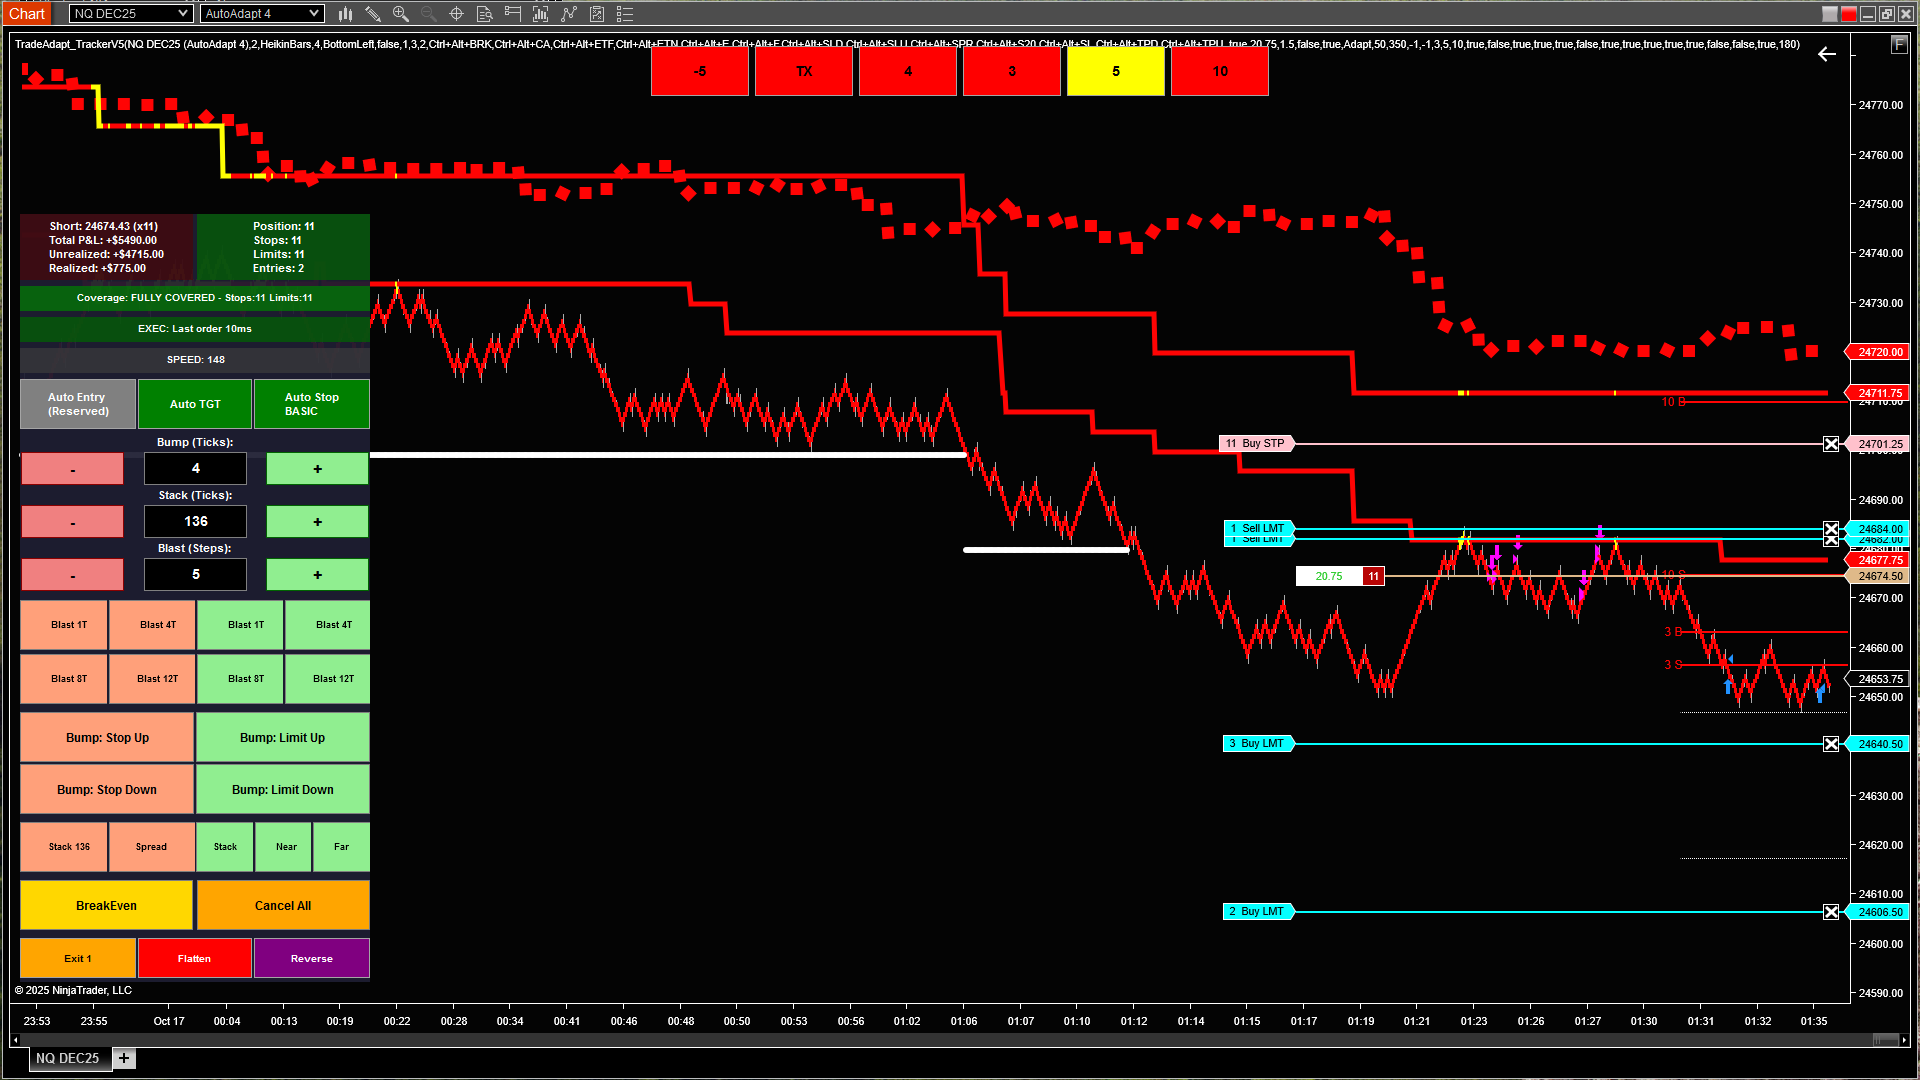
Step 3: Continued Targets – Trailing Stop Activation
As additional targets are hit, stop trails down to lock in profits (click to enlarge)
As more profit targets fill, the stop continues to trail. Notice how the stop has moved down (for this short position) to lock in gains. The system is protecting accumulated profits while letting the winner run. Position size decreases as each target fills.
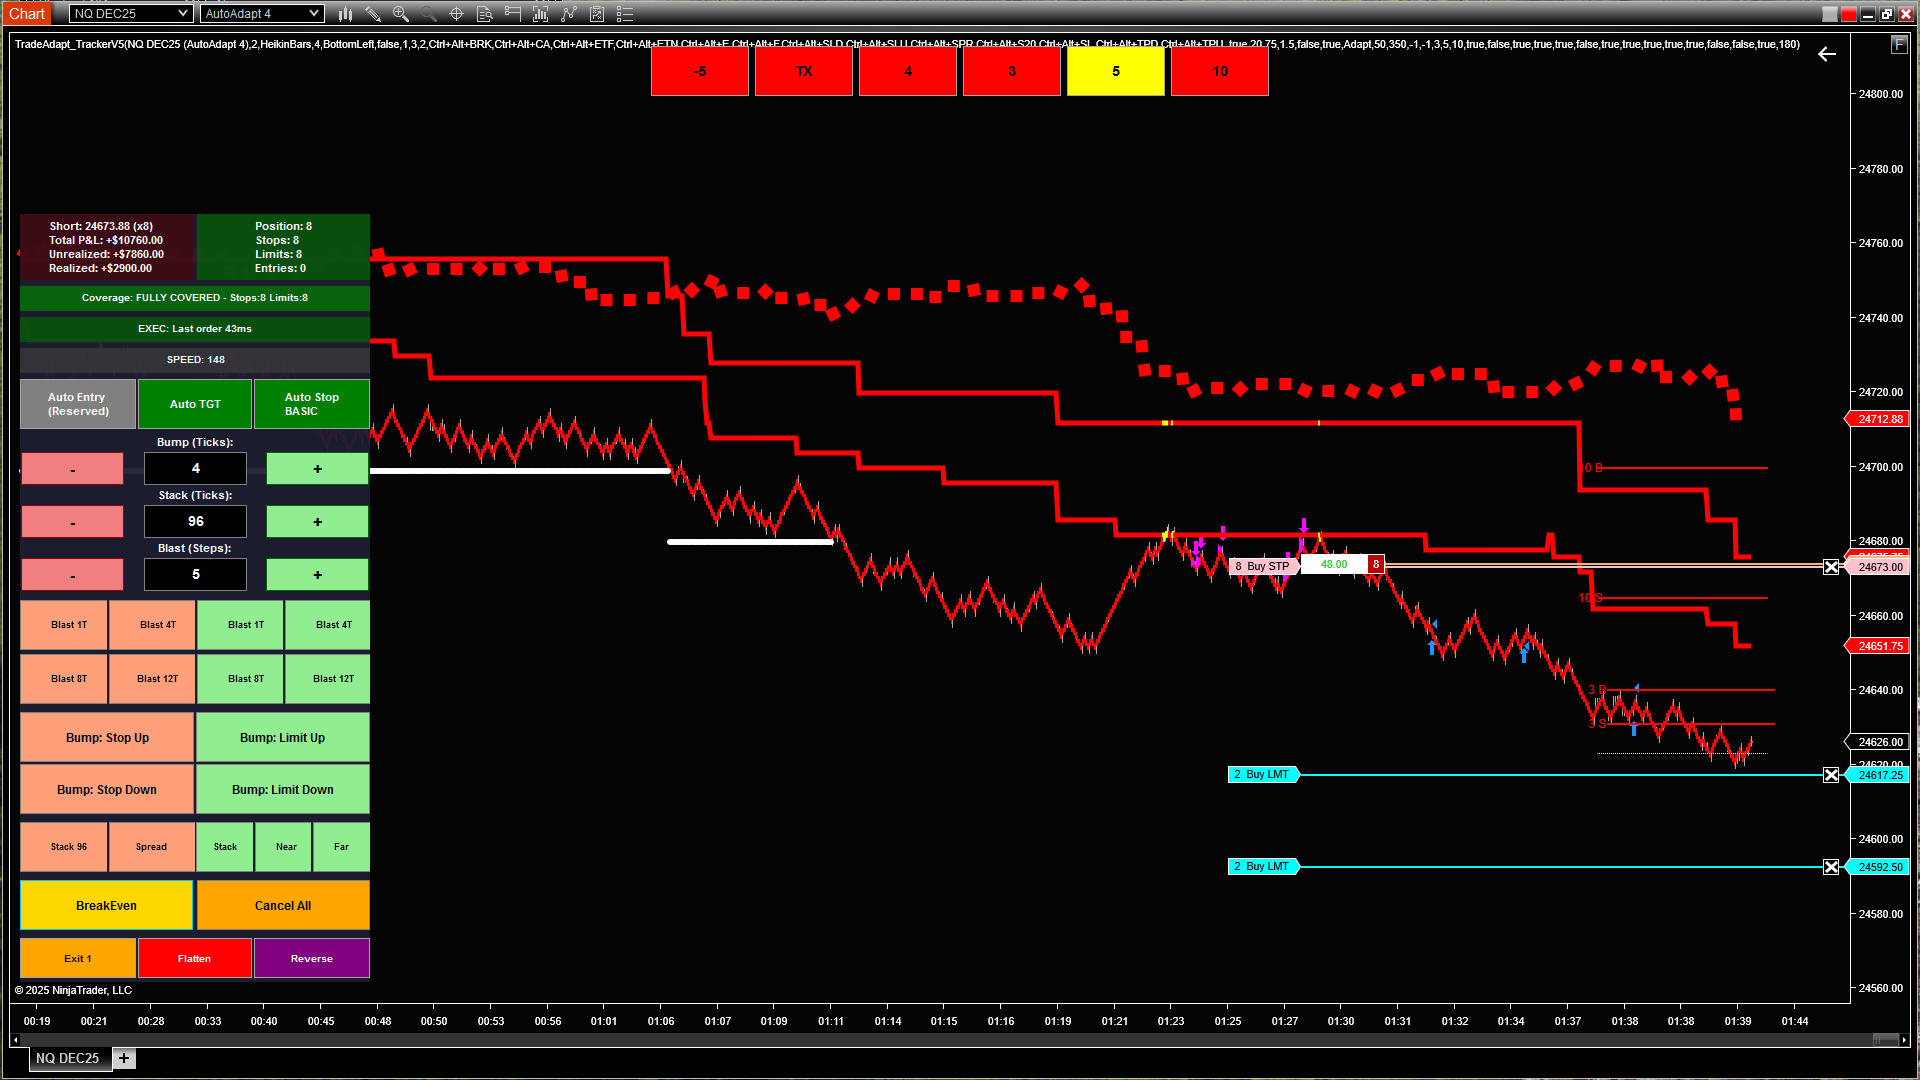
Step 4: Final Contract – Maximum Profit Protection
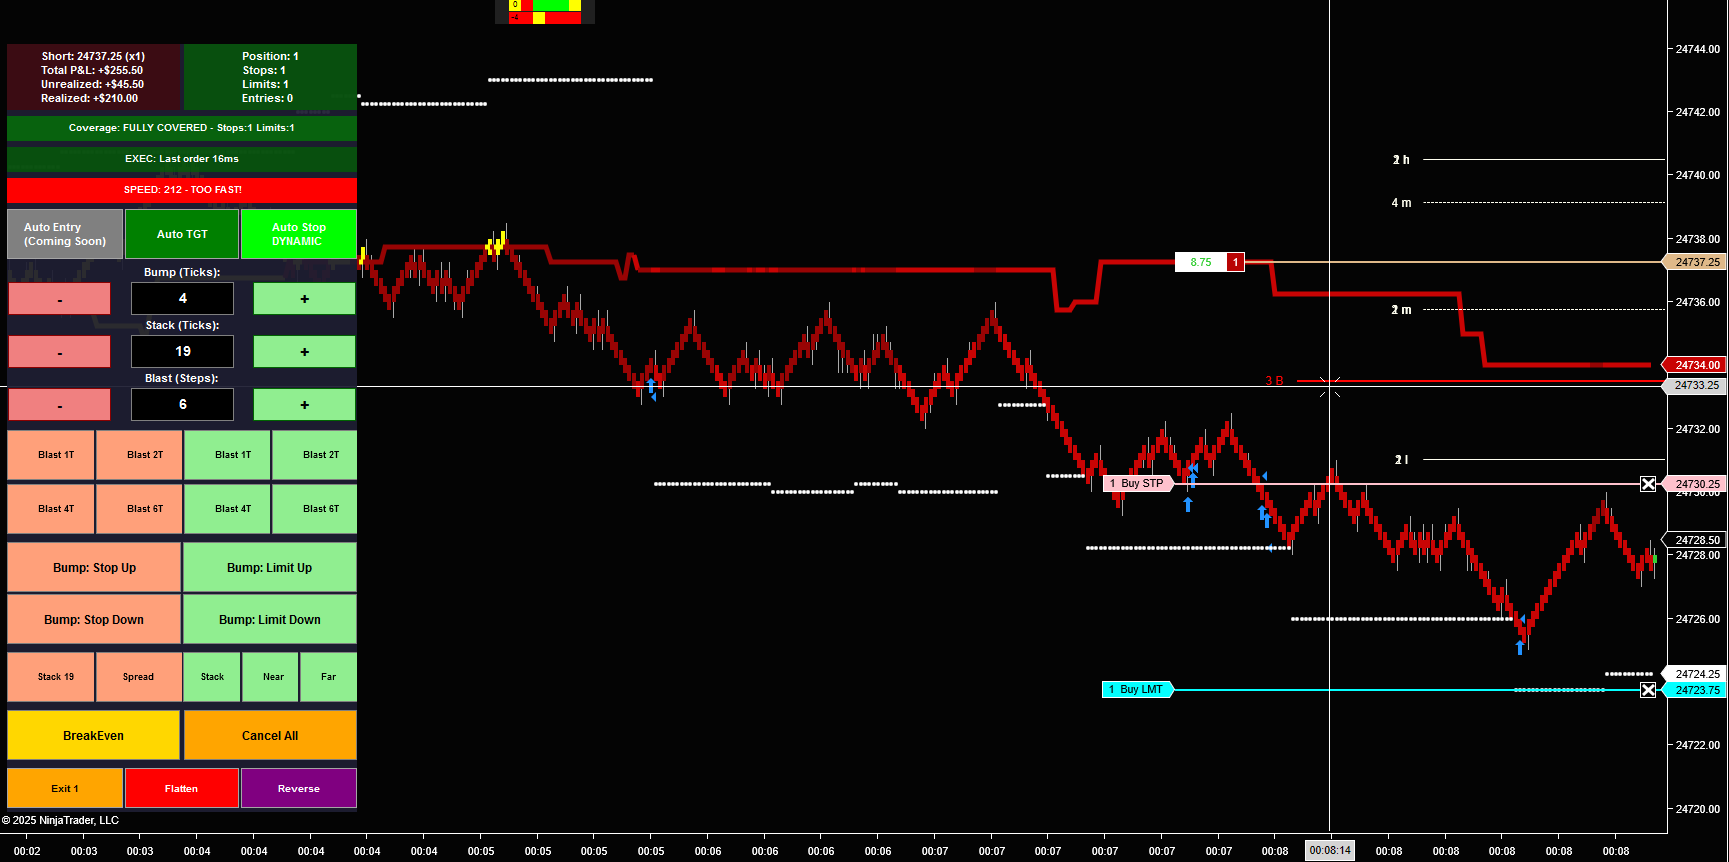
Down to 1 contract remaining with stop protecting substantial profit (click to enlarge)
The final stage: only 1 contract remains. The stop has trailed aggressively to protect the significant profit already captured. The widget shows “Position: Short 1” with the stop firmly in profit territory. This is how professional traders scale out of positions – taking profit along the way while giving the final piece room to capture extended moves.
• Protected the trade with initial stops
• Moved to breakeven after first target (eliminated risk)
• Trailed stops as more targets filled (locked in profits)
• Scaled position down systematically
• Kept final contract protected with tight trailing stop
All of this happened automatically through the Auto Stop and Auto TGT features. The trader set it up once and let the system manage the complexity.
The Professional Advantage
This type of trade management separates professional traders from amateurs:
- Amateurs: Hold full position hoping for best case, get stopped out on reversal, give back all gains
- Professionals: Scale out systematically, move to breakeven early, trail stops, protect profits, let final piece run
TrackerV5 automates the professional approach. You don’t need to watch every tick, manually adjust every stop, or make emotional decisions about when to take profit. Set your parameters, enable Auto Stop and Auto TGT, and let the system execute your strategy with discipline.
• Auto Stop: Enabled (handles all stop adjustments)
• Auto TGT: Enabled (places targets automatically)
• Stop Trail: Configured to move with each target fill
• Target Distribution: Multiple levels for scaled exits
The widget handled everything from that point forward.
Core Features
One-Click Blast Orders
Send multiple orders to the market simultaneously. Instead of clicking through order entry windows, a single button can:
- Enter position at market price
- Place protective stop orders
- Set multiple profit targets
- Configure all parameters in advance
Everything fires with one click. This is critical for fast-moving markets where delay means worse fills.
Automated Stop Management (Auto Stop)
Once enabled, the system monitors your position and adjusts stops automatically based on profit targets hit:
- Initial Protection: Places stop at your defined risk level
- BreakEven Move: After first target fills, moves stop to entry price (no-risk position)
- Trailing Action: As additional targets fill, trails stop to lock in accumulated profit
- Scaling Logic: Adjusts stop placement based on remaining position size
Automated Target Management (Auto TGT)
Companion feature to Auto Stop – places and manages profit targets:
- Multiple target levels based on your strategy
- Automatic contract distribution across targets
- Target cancellation as they fill (no orphaned orders)
- Synchronized with stop management
Order Stacking & Distribution
The new TGT: Stack X button revolutionizes exit management:
- Creates ladder of limit orders at configurable intervals
- Distributes contracts evenly across price levels
- Lets you scale out systematically as price moves in your favor
- One click to deploy entire exit strategy
Example: 10 contracts, Stack 5 targets = 2 contracts per target level, spaced at your defined interval.
Widget Interface
Position Display Section
Always visible at the top of the widget:
- Direction: Long, Short, or Flat
- Quantity: Current position size
- Average Price: Your entry price (important for P&L calculation)
Entry Buttons (Top Row)
Stop Management Section
Target Management Section
Quantity & Settings Section
Configure your order sizes, intervals, and behavior preferences. The widget remembers your settings across sessions.
Advanced Features
50/50 Position Split
Specialized buttons for traders who like to manage half their position differently:
- Place stops on 50% of position while leaving other half unprotected
- Take profit on half while letting remainder run
- Different risk/reward approach on each half
Hotkey Integration
Every button has a configurable hotkey. Trade without touching the widget. Keyboard-only workflows for maximum speed.
Visual Feedback
Buttons change color based on state:
- Green: Function active (Auto Stop enabled, orders working)
- Gray: Function inactive
- Red/Orange: Destructive actions (Flatten, Reverse)
Sound Alerts
Configurable audio notifications for:
- Order fills
- Stop adjustments
- Target hits
- Position changes
Workflow Examples
Basic Market Entry with Protection
Scenario: You see a setup, want to enter 5 contracts long with 10-tick stop and 20-tick target.
- Set quantity to 5
- Click BUY (position entered at market)
- Click STP: -10 (stop placed 10 ticks below entry)
- Click TGT: +20 (target placed 20 ticks above entry)
Four clicks. Position protected. Simple.
Automated Risk Management
Scenario: Same entry, but you want the system to manage stops as targets fill.
- Set quantity to 5
- Enable Auto Stop (green)
- Enable Auto TGT (green)
- Configure target levels in settings (e.g., 3 levels at 10/20/30 ticks)
- Click BUY
System places entry, stop, and all targets. As each target fills, stop trails. You monitor, system manages.
Scaled Exit with Stack
Scenario: 10 contract position, want to exit in 5 levels as price moves in your favor.
- Position already entered (10 contracts long)
- Configure Stack interval (e.g., 5 ticks between levels)
- Click TGT: Stack 5
System places 5 limit orders: 2 contracts at +5 ticks, 2 at +10, 2 at +15, 2 at +20, 2 at +25. One click, entire scaling strategy deployed.
Emergency Flatten
Scenario: Something’s wrong, need out NOW.
- Click FLATTEN
Done. Position closed at market. All working orders cancelled.
Configuration & Settings
Getting Started
Default settings work for most markets. Key settings to review:
- Default Quantity: Your typical position size
- Stop/Target Ticks: Default distances for quick orders
- Stack Interval: Spacing for ladder orders
- Auto Stop Behavior: BreakEven trigger, trail amounts
Customization
Advanced users can adjust:
- Target distribution (how contracts split across levels)
- Trailing logic (aggressive vs conservative)
- Hotkey assignments
- Widget position and size
- Sound and visual alerts
Testing Protocol
CRITICAL: Test extensively in NinjaTrader’s Simulation Mode before live trading. Understand every button, every automation, every edge case. Practice until it’s second nature.
Support & Resources
Documentation
Visit TradeAdapt.ai for:
- Video tutorials and setup guides
- Advanced strategy documentation
- Indicator property explanations
- Code documentation (open source)
Community Support
Join our trading community for:
- Strategy discussions and workflow ideas
- Troubleshooting help from other users
- Feature requests and feedback
- Market-specific configuration recommendations
Updates
TrackerV5 receives regular updates with:
- New features based on trader feedback
- Bug fixes and performance improvements
- NinjaTrader compatibility updates
- Additional order management capabilities
RISK DISCLOSURE & DISCLAIMER
TRADING INVOLVES SUBSTANTIAL RISK OF LOSS
Trading futures, forex, stocks, and other financial instruments involves substantial risk of loss and is not suitable for every investor. The high degree of leverage can work against you as well as for you. You should carefully consider whether trading is suitable for you in light of your circumstances, knowledge, and financial resources.
Only risk capital should be used for trading. Risk capital is money that can be lost without jeopardizing one’s financial security or lifestyle.
THIS SOFTWARE IS A TOOL, NOT A GUARANTEE
Heikin Tracker (Signal and Execute/TrackerV5) is an order management and analysis tool designed to help you execute your trading decisions more efficiently. It does NOT:
- Make trading decisions for you
- Guarantee profits or prevent losses
- Replace proper risk management and trading knowledge
- Ensure successful trades or prevent bad trades
NO WARRANTY
The software is provided “as is” without warranty of any kind, either express or implied, including but not limited to warranties of merchantability, fitness for a particular purpose, or non-infringement. TradeAdapt.ai does not warrant that the software will be error-free, uninterrupted, or meet your requirements.
USER RESPONSIBILITY
YOU are responsible for:
- All trading decisions and their outcomes
- Understanding how each button and feature works before using with real money
- Testing all functionality in simulation mode first
- Verifying all orders before and after execution
- Maintaining proper risk management at all times
- Understanding the markets you trade and the risks involved
AUTOMATED FUNCTIONS
Features like Auto Stop and Auto TGT automate order placement based on your settings. While designed to help manage risk, automated systems can malfunction. Always:
- Monitor automated functions actively
- Have manual override capability ready
- Test automated features extensively in simulation
- Understand that technology can fail
MARKET RISKS
Be aware of:
- Slippage: Orders may fill at different prices than expected, especially in fast markets
- Gap Risk: Markets can gap through your stops, resulting in losses larger than planned
- Liquidity: Not all markets have sufficient liquidity for all order sizes
- Connectivity: Internet or broker connection issues can prevent order management
LIMITATION OF LIABILITY
In no event shall TradeAdapt.ai, its owners, developers, or affiliates be liable for any direct, indirect, incidental, special, consequential, or punitive damages arising out of or relating to your use of this software, even if advised of the possibility of such damages.
This includes but is not limited to:
- Trading losses of any kind
- Software bugs or malfunctions
- Missed trading opportunities
- Incorrect order execution
- Data loss or corruption
TESTING REQUIREMENT
CRITICAL: You MUST test Heikin Tracker thoroughly in NinjaTrader’s simulation mode before using it with real money. Understand every button, every hotkey, and every feature. Practice until the workflow is second nature. Real money trading without thorough testing is reckless.
SEEK PROFESSIONAL ADVICE
This software and documentation do not constitute investment advice. Consult with a licensed financial advisor, attorney, or tax professional before making investment decisions.
By using Heikin Tracker (Signal and Execute/TrackerV5), you acknowledge that you have read, understood, and agree to this entire disclaimer and risk disclosure.
You further acknowledge that:
- You understand trading involves substantial risk
- You have tested the software in simulation mode
- You are solely responsible for all trading decisions
- You will not hold TradeAdapt.ai liable for any losses
- You are using this software at your own risk
© 2025 TradeAdapt.ai | All Rights Reserved
Heikin Tracker: Signal + Execute (TrackerV5) | Version 5.0